Sunday, December 18, 2011

Parsnip Muffins

After watching an episode of Good Eats a couple years ago I made some parsnip muffins. I don't remember if I used Alton's recipe or not, but they were incredible. I came across another recipe recently that calls for garam masala and I was intrigued. I decided this morning to make some parsnip muffins but I didn't have all the ingredients on hand from any single recipe, so I mashed together several recipes into my own. These muffins turned out really well. The garam masala and parsnip gave them a nice warm peppery flavor that I love.

I'm hoping this can be a good basic recipe for muffins that I can interchange the fruit, vegetable or spices. I may try it again tomorrow or next weekend with dried blueberries.


Parsnip Muffins

1 c all-purpose flour
1 c whole wheat flour
1 t baking powder
1 t baking soda
½ t salt
freshly grated nutmeg
1 t garam masala
1 t cinnamon
2 eggs
¾ c oil
½ c almond milk
1 ½ t vanilla
1 c sugar
3 grated parsnips

Heat oven to 350.

Mix dry ingredients in large bowl. Mix wet ingredients in small bowl. Add wet ingredients and parsnips to dry ingredients and mix.

Bake 20-25 minutes until toothpick comes out clean or tops spring back when touched.

Makes 18 muffins.

Thursday, November 17, 2011

Easy Vegan Black Bean Soup

Since watching the documentary Forks Over Knives a couple of months ago, I've been making more of an effort to make my diet more plant heavy. This week I got my first reward, I dropped down a dress size!

For most of my life I was at a healthy weight. Once I started seeing a neurologist for my migraines, I started packing on the weight as a side effect of the medications. I've been struggling since I went off the meds in 2006 to take the weight back off. I had gone down a dress size fairly quickly and kept that weight off, but then I hit a plateau and even though I was eating healthy and increasing my activity levels, I just wasn't losing any weight. Now I feel motivated to stay on this course of a plant heavy diet and see how many more improvements I make not just to my weight, but also other health issues.

Tonight's dinner turned out super yummy. It's extremely easy too.

Ingredients:
4 cans refried black beans
1-2 cups of water (use what you need to make the soup a consistency you like, it may take more water)
1-2 Tbs minced garlic
1 diced onion
1 can Rotel
Cayenne
Espazote (this is an herb common in Mexican cooking and also used as a tea)
Oregano
Lime
Olive Oil

In a pot, add oil, onion and garlic and cook on medium heat until onions are translucent. Add Rotel and beans. As the beans heat up and spread, add water and herbs to taste. I think I used about a teaspoon of each except the cayenne which was only 1/4 teaspoon. Add a squeeze of lime before serving. You may also serve with tortilla chips.

Sunday, November 13, 2011

Homemade Sinus Rinse

I recently ran out of the NeilMed sinus rinse packets and was unable to find them in my local stores, so I set out to find a homemade alternative. The ingredients are simply a non-iodized salt, distilled or boiled and cooled water, and baking soda. It's so much cheaper to make at home and just as effective as the packets, I won't be buying the packets anymore.

If you've never tried a sinus rinse before and have nasal allergy problems, you'll want to try this. The first one or two times you do it it'll be weird, I won't lie. It's not painful, but it can be uncomfortable. Once you know what to expect though it's easy to do and so much more effective than any allergy medication.

1. In a clean glass or measuring cup, add 8 oz water and heat in the microwave in 10 second increments until body temperature. Any warmer and it may feel like you're burning your nostrils. Make sure to mix the water after each 10 second increment as the water on top is often hotter than the water on bottom.

2. In the sinus rinse bottle, add 1/4 teaspoon baking soda (this helps keep the salt from burning), 1/2 teaspoon salt, and water. Gently shake to combine until dissolved.

3. Leaning over a sink, gently squeeze bottle into one nostril letting it exit through the other. Blow nose and repeat in opposing nostril.

There are all kinds of videos on YouTube showing you how to do it. Here's one that I particularly enjoy, showing you can do the sinus rinse with a water bottle with a squirt tip:

Friday, October 21, 2011

Post Produce Day

I read in another blog that Saturday, October 22 is Post Produce Day and to blog about what you are harvesting. I'm heading out of town tomorrow for a baby shower, so I'm making my post tonight.

I wish now I had taken photos because tonight I happened to harvest the rest of my basil. It was all going to seed with the cooling temperatures, so I made pesto pasta and it was so yummy!

Soon I'll be harvesting more herbs to dry and use this winter. Next week I will probably tackle the oregano. I bought it on sale at Walmart a couple months ago and unfortunately it has zero aroma or flavor to it, thankfully it only cost me $1.50. Next year I think I'll try planting a couple different varieties and hopefully find one I love.

I have been picking lettuce regularly to use in what my husband calls "Poor Man's 7-Layer Burritos". They are a vegan version and contain 6 ingredients: black beans, salsa, onion, tomato, guacamole and lettuce. They are incredibly yummy though and have become my go-to meal on laundry and shopping days replacing salad with chicken. Now that the temps are dropping, I'm really hoping the lettuce will stop trying to bolt and start filling out again. If not, I've learned some lessons for next year - keep the soil moist and shade the plants.

Sunday, October 16, 2011

Cold Hardiness

Tony and I are sitting around tonight watching Conan, listening to Irish punk (Dropkick Murphys and Flogging Molly), having fried rice for dinner (which I feel I have perfected my recipe and should post soon), and it occurred to me that I should figure out what the cold hardiness is for each of my plants seeing as we might have our first light frost this week. The predicted low Wednesday night is 31 for Red Oak and since we're a little higher altitude our temperatures sometimes run about 5 degrees cooler.

Here's the list:
Cauliflower: Cold/Frost Tolerant
Brussels Sprouts: Cold Hardy/Frost Tolerant
Kale: Cold Hardy
Romaine Lettuce: Cold Tolerant/Cold Hardy
Carrots: Cold Hardy/Frost Tolerant
Green Onions: Cold Tolerant/Cold Hardy
Garlic: Cold Tolerant
Spinach (seedlings): Cold Hardy
Swiss Chard: Cold/Frost Tolerant
Arugula: Cold Hardy
Tomatoes: Tender
Rosemary: Tolerant to approx. 30, although some leave out all winter in Zone 7 and it's fine
Sage: Hardy
Oregano: Varies
Basil (Sweet & Lemon): Tender
Mint: Hardy
Lavender: Varies/Hardy
Dill: Tender

Moss Rose: Tender
Red Bud: Hardy (experience)
Pecans: ...

It appears the only things I need to worry about are the tomatoes, basil and dill. Since it may only drop below freezing one night and probably only for a few hours, I can bring in the few that won't make it and everything else will be fine. Once the temperatures officially start dipping below freezing then I'll consider harvesting various herbs.

Monday, October 10, 2011

Gardening Notes

As I'm learning more about when to plant what, I'd like to have a central place to turn to for notes.

-Plant garlic on Columbus Day: http://www.organicgardening.com/tags/garlic

-Plant potatoes on Good Friday: http://www.organicgardening.com/tags/potato

-Plant tomatoes on Memorial Day: http://www.organicgardening.com/tags/tomato

Monday, September 12, 2011

The Heat Won't Give Up...

We live in the South, so as much as we long for cooler weather, the heat doesn't want to give up. The next few days we'll be in the mid to upper 90s, if not low 100s and that's not good news for my newly planted fall garden. The varieties I planted are heat tolerant, but not satan's armpit tolerant, so I used a bed sheet to create a tent over the bed. It seems to be working like a charm. I'm still having to keep an eye on the plants at each end because they aren't covered all the time, but they seem to be doing okay with some heavy watering.

In other news, Tony started drilling holes and setting pipes for the plumbing drainage system this weekend and realized he bought some of the wrong parts for the pipes so I'll be making a trip to Home Depot this week so we can work on that more this next weekend.

As for me and my personal projects, I'm looking into switching us to a diet that isn't so heavy with meat and dairy. I'm tired of battling sinus infections and I'm hoping that by eliminating the dairy from my diet it'll clear up the chronic infections. I also watched Forks Over Knives on Netflix and I'm amazed at how a plant heavy diet can reverse so many medical conditions. It's inspired me to figure out more ways to expand our garden beyond the 5-6 raised beds we have planned.

I have several knitting and crochet projects I'm working on, but the one I'm most excited about is the Palindrome Scarf. It may be hot outside and I'm forced to sip iced green tea but I'm daydreaming of winter and mugs of hot green tea. The local/little yarn shop in Fort Smith is closing and she has all her yarn on sale for 50% off. I picked up a couple skeins of a no-pill acrylic in Iron that is super soft. I'm in love with this yarn and so I decided I wanted to teach myself to knit cables with it. The "palindrome" comes from the scarf looking the same on both sides.

Sunday, September 4, 2011

First Square Foot Garden Bed

I finally got the first bed built today!!! With the heat it's just been impossible to do anything. Today we have a cold front pushing through so it'll be the first week we haven't been over 100 in 11 weeks here in Oklahoma (Texas was over 100 a few weeks before Oklahoma).

It was still hot this morning, it got up to 89 with a heat index of 91 while we were building the bed, but there is a chance of rain this afternoon so we wanted to get it done so it could soak up some water before I plant this week.

I made some changes from my original plans that I posted earlier in the summer. First, because of cost we decided to go ahead and try 2x6x8 pine boards instead of cinder blocks as the frame. When/if the boards need replacing, then we'll use cinder blocks. Next, I used perlite instead of vermiculite. There are a few reasons for this. One, I couldn't find vermiculite in our area. Two, perlite is about half the price of vermiculite. Three, asbestos has been found in vermiculite and one company was shut down which may be why it's so difficult to find vermiculite and why the price has skyrocketed.

What is the difference between perlite and vermiculite? There are many, and while similar products, perlite allows for better drainage while vermiculite tends to absorb water. I'm not worried about the perlite not holding water. If anything, because of the heavy clay below, I'd prefer perlite that drains so the soil doesn't become soupy. We are going to set up a laundry to landscape greywater system, so retaining moisture won't be an issue.

Here's the before shot.
 

Tony built the first box and we raked up the area underneath to remove any weeds and big rocks.
 

Then Tony built a second box and secured them together. 

Next I layered old cardboard underneath to block weeds, while Tony screwed in another board to help keep the box from bowing.
 

Then we layered and mixed peat moss, perlite and cow manure until the box was full.


Frugal Thrifty Green

A friend and I have started a joint blog that I thought I'd mention here. Frugal Thrifty Green is a place where we are going to share inexpensive recipes, money saving ideas, ways of doing things cheaper in a more environmentally sustainable manner, etc.

The co-author, Amanda, is a friend that I've known since 2006 when we met after trading a book at PaperBackSwap.com. It's a coincidence that Tony and I ended up moving an hour from where she lives. She's been such a blessing helping us out by letting us come over to do laundry, get water, and just being a great friend that helps keep me sane during all the chaos of living in a new place. Plus she knows a lot of great places to eat and shop.

It's awesome to have someone with the same values yet different perspectives so we can bounce ideas off each other and think of new ways to do things. I'm really excited to see where things go.

Sunday, August 14, 2011

Tomato Pie

Tonight I made the Tomato Pie recipe from SimplyRecipes.com. It was my first time to make pie crust and it was all so delicious! I do want to make some notes for myself about the recipe though and see how it comes out next time.

I'm not a fan of mayo. Sometimes it lends itself well to a recipe, but this time I felt it made the dish too rich. Next time I'll either use just enough mayo to bind the cheese together or skip it all together.

I'll take the advice from the original recipe of caramelizing the onions first.

I may also try baking the crust for a few minutes first.

Tony (my husband) thinks adding chicken or ground turkey to the dish would also be tasty.

Photos from the process:

Layers from bottom up: crust, diced red onion, diced tomato, fresh basil, salt and pepper.

With cheese mixture using the grill as an oven:

Done!


Thursday, August 4, 2011

Can it get any hotter?

This week we've been hitting record highs for the area and I've experienced the hottest temps that I can remember in my lifetime. It was 117 when I was running errands in Fort Smith on Tuesday and our lowest high has been 108. This has been our roughest week yet. The inside of the house has been getting up to 97 and 99 because the two little window units we have are designed for small rooms, not 640 sq ft of mostly open space. We have been receiving very light rain in the evenings with wind that cool things down to the 90s and 80s and we've only had one almost unbearable night so far. It's that humidity though that is making the days so difficult.

Our female Great Pyrenees, Kira, is old (she'll be 10 in October) and hasn't always had the best health and has an incredibly weak bladder, so I'm having to take her out to pee every 30 minutes and keep a close eye on her with the heat. I have a hard time handling heat myself, so I'm instantly sick to my stomach every time I take her out and I've had some horrible migraines the past couple of weeks, although they seem to be tolerable on the days I get to stay home and not be out in the heat for more than a couple of minutes at a time.

We have most of the wall insulation up, however we don't have a ceiling up yet so that is a big contributor to the hot temps inside, plus it's going to be hard no matter what when it's over 105 outside. It's sad that 105 sounds tolerable and 100 sounds down right cold these days.

My garden this summer has been in containers. I'm shocked that almost everything is still alive. I've lost my dill, cilantro, one tomato plant and a moss rose, but I still have two tomato plants (not that they are really producing, I've gotten 5 fruit off them but they weren't even edible), two basil (one sweet and one lemon), sage, a moss rose, a pecan seedling, a handful of redbud seedlings (they are really struggling though), and 4 pumpkin seedlings (I just started them 2-3 weeks ago just to see if they can produce by our first frost).We're on the southeast side of the mountain, so we start getting shade around 6pm and I think that is what has saved my plants.

It's been too hot to start the square foot garden beds, and seeing how money is tight since we're still recovering from moving, we've decided to build the beds with pine and when the time comes to replace them we'll use either cedar or cinder blocks.

We bought the toilet last weekend!!! We haven't installed it yet. We still have plumbing to run, holes to drill, and water to haul so we can use it, but we have it!

In all we might not be getting much accomplished lately and just struggling to get our day to day things done, but we're hanging in there. I'm just grateful that we do have electricity and a/c units that I can crash in front of on the couch during the day and get caught up on several baby blankets I have to make. There are so many people out there who aren't as blessed as we are, I really am thankful for what we have.

Sunday, July 24, 2011

July's Activites

It has been so incredibly hot this month that we haven't done a lot. We've been paying off bills on the house in Texas, started paying new bills here in Oklahoma and it's taken a toll on our finances. As of the first of August we should have everything in Texas paid and that will free up money for building.

Last weekend we purchased a one-piece tub/shower surround from Lowes that turned out to be cheap plastic that cracked in the warehouse when something heavier was placed on top, but we didn't catch it until we brought the shower home and were unloading it. We took it back and now we're saving the money to get a similar product from Home Depot that is made of fiberglass and $60 cheaper. 

Through the flush fund we've received $271 towards the bathroom so far. We feel so incredibly blessed and lucky. Next weekend we'll go purchase the toilet and shower. This weekend it's been 105+ and we've both been so hot and miserable that we've decided to relax a bit and spend time putting up insulation and organizing stuff in bins since we don't have shelving or cabinets installed yet.

Thursday, July 14, 2011

Harvesting Seeds

This spring I was jonesing to grow some herbs and veggies but seeing as we would be moving soon I wasn't able to do a proper veggie garden, so I decided to start some basil in a pot that I could take to the new house with me. I came across some heirloom lemon basil at the local feed store. I feel it's important to learn to grow heirlooms from seed as a form of self-sufficiency.

I thought I had made a post showing how I germinated the seeds, but apparently I didn't. I'll have to make sure I document that when I do it again later. Essentially I filled a pot with organic potting mix, sprinkled the seeds on the surface, sprayed it until it was moist, then laid a piece of plastic wrap over the top and secured it with three clothes pins so there would be gaps to allow for airflow but still hold in the moisture. I've had a problem with mold in the past when there hasn't been sufficient airflow and it's killed the seedlings. I kept it either on the top of the stove (which was gas and the pilot light kept it warm) or in a sunny windowsill until the seeds sprouted and then I set them outside during the day to acclimate. After a couple of weeks when the temperature stayed 50s or above at night I left it outside. I started with 8 seeds and thinned them down to the hardiest one. Once the second set of leaves appeared (the first set of true leaves, not not cotyledons) I began fertilizing the seedling once a week.

Here's the seedling after approximately a month:

Here's the plant after approximately 3 months:
I noticed today one of the stems with flowers was dried, so I pulled off the flowers so I could open them and search for seeds. Each flower averaged two developed seeds although some had as many as four and others had zero.
Out of the flowers I pulled off one stem I ended up with approximately 75 seeds that I believe may be viable. There were many undeveloped seeds that I threw away. It amazes me that one plant can produce hundreds of seeds. One of my favorite sayings that I viewed at the Fort Worth Botanical Gardens is "It only takes one acorn to grow a forest".

Here's what the seeds look like:
There is something about seeing the cycle of life complete itself in such a short amount of time that simply amazes and inspires me. I feel like I experience a miracle with the life cycle of each plant.

Wednesday, July 13, 2011

Flush Fund

An amazing friend was joking a couple nights ago that she should start a collection to buy a toilet for our house as an anniversary/housewarming gift. Tony and I are celebrating 13 years together this week. She said she'd mail me $1 and I joked back that she could send it through PayPal. I wake up yesterday morning and she made a post on my Facebook page asking my friends and family to each donate $1 towards the Flush Fund. She joked that it would be fun to buy us a gold toilet. I told her that would be quite expensive so I offered to stencil the name of anyone who donates in gold on the toilet. It's been so much fun that several other amazing friends have reposted the Flush Fund info on their Facebook pages and given a brief history of how we got here and why we don't have a toilet. Now we have more than enough for the toilet, seat and taxes. This is such a HUGE relief seeing as we have had to keep putting off buying the toilet and other bathroom items because we're trying to recover from all the moving expenses, paying off the bills from Texas, and start paying the new bills for the house here in Oklahoma.

I am incredibly grateful to everyone who has donated. I will keep adding names to the toilet for anyone who wants to contribute $1. Donations can be made to ezrinjaz@yahoo.com via paypal. I will never forget what everyone has done for us and will make sure to pay it forward to others.

Saturday, July 9, 2011

Mother Earth News Article

I'm assuming that those of you who read my blog know about the blog post that editor Robyn Lawrence wrote about us living in a small home. Just in case not and you'd like to take a gander here's the link: http://www.motherearthnews.com/natural-home-living/2-people-in-640-square-feet-we-have-more-than-enough.aspx

I obsess over Mother Earth News Magazine and replied to a query on Facebook asking people to respond if they live in a small home. Since we've moved from an 1800 sq foot home in the city, to a 900 sq ft home in the country and found that home was still too big for us and now we're building and finally living in the 640 sq ft home I thought I'd respond. I'm quite excited that I did.

And I want to say thanks to any of you who stop by. I'm truly honored that you've given a bit of your time to me.

Friday, July 8, 2011

Living Without Plumbing

Tony and I are coming up on a month in the new house and we still don't have plumbing yet. We're hoping to get the bathtub and toilet installed in the next few weeks as long as finances cooperate, and I'll have to hold out on the vanity I want for a little bit longer. Until then I thought I'd share how we're getting by without indoor plumbing. If you had told me four weeks ago that we would be getting by comfortably without plumbing I would have told you that you're crazy. Oh! Here's an updated photo of the house.
Each day we fill up a 5-gallon water container that has a spigot at Tony's work or a friend's house. We have 3 of these containers that we rotate through. We have it set up on a bathroom sink/counter that was given to us by Tony's mother and step-father that had been salvaged from an office building that was torn down. Why am I not planning to use this counter top in this house? It's because of space. We plan to put in shelves or cabinets on either side of the vanity since the bathroom is so small so we have a place to store linens. This counter top we are going to save for another small house we plan to build in future years. The sink drains into a 5 gallon bucket that we saved from adhesive we used to adhere the OSB on the floor to the insulated panels they are set on. We use this water for ornamental plants. For dishes, I have a wash basin that I use and that water is generally safe enough to water my herbs and tomatoes.
For showers, I found a camping solar shower for $6-7 at Walmart. We fill it with 2-3 gallons of water each morning and let it heat up during the day then take showers just after dark before we head off to bed. Our house is located down the side of a mountain in a secluded area so there is very little chance of anyone seeing us. They'd have to hike down or drive down the hill and we'd know they are coming. Tony also built a platform for us to stand on while we shower.

When we started building the house back in October 2010 on the weekends, we simply trekked off into the woods to take care of our "business". Now that we've moved, we use a bucket we purchased at Cabela's years ago for when our house in Texas had septic problems. We use a corn husk based cat litter that is biodegradable and compost that waste with waste from the cat box that once it's broken down I'll use as fertilizer for my ornamentals.
The only thing I'm not really able to do at home efficiently is laundry, so every Tuesday I make the hour drive to Fort Smith, AR and do laundry at a friend's home. Once we have the plumbing set up, then we will haul water at first from the local rural water company or a neighbor that we'll purchase water from. I bought several 300 gallon water storage units earlier this year that we'll store the water in. Later this summer we'll set up a captured rainwater system so we don't need to haul water except in times of drought.

Getting by without the indoor plumbing and learning to conserve water has been a blessing. Once we have the captured rainwater system set up I'm confident we will get by comfortably again and not have to stress over water. I love the idea of knowing we will have little impact on the water tables and help preserve that water.

Sunday, July 3, 2011

Cost of Building Square Foot Garden

Today Tony is putting up insulation in the bathroom and running the plumbing lines. It's not anything he needs much help with, so I'm working on plans for other things like our square foot garden beds. Since we ended up moving in June instead of May, I'm too late for a spring/summer garden, so I'm planning for a fall garden instead.

Tony's mother has had a garden for years. She has always used cinder blocks as a border and when she downsized her garden just over a year ago, she gave us all her extra blocks. I'm going to simply build one garden at a time and since at the moment we only have enough blocks for one or two beds, I thought I'd price the blocks as well as potting mix.

At our local Home Depot, the blocks run $1.53 for 8" x  8" x 16" blocks and $1.09 for 4" x 8" x 16" blocks. We will need a total of 16 of each type of block to make the bed a depth of 12", for a total cost of $41.92.

For the potting mix, a mixture of 1/3 organic compost, 1/3 peat moss and 1/3 vermiculite is recommended. We will need 16 cubic feet of potting mix to fill each bed, although I plan to go a little less than 16 cubic feet to allow space for mulch. Let's say I do 15 cubic feet just to approximate the cost of potting mix. I will need 5 cubic feet of each component. The organic compost I was viewing didn't give a measurement in cubic feet, so I had to do some math. Just in case you ever need to know, there are 1728 cubic inches in one cubic foot (and to measure cubic inches or feet, multiply length x width x height). Each bag of compost is approximately .5 cubic feet at a cost of $1.67 per bag. The peat moss is 3 cubic feet per bag at a cost of $9.75 per bag. Then the vermiculite holds 2 cubic feet per bag at $19.97 per bag. So I will be needing 10 bags of compost, 3 bags of peat moss and 2 bags of vermiculite for a total cost of $85.89.

This will bring my total cost per bed to $127.81. Now since I will have some leftovers from the bags of peat moss and vermiculite and I do have some cinder blocks on hand, my cost will end up being a little less. It may seem expensive to initially build the beds, and it is, but when I consider how much I spend on fresh produce each week, the cost of each bed will pay for itself in one growing season.

Tuesday, March 22, 2011

Companion Planting

I came across an article from Mother Earth News on companion planting today. The idea seems to be instead of planting things to "drive away" certain insects, plant items that attract birds and other insects that will eat the problem pests. I'm planning to plant cream peas and okra this summer so I'm thinking I'll plant some sunflowers with them and see how things work out.

Wednesday, March 16, 2011

Exterior Panels

First off, here is an article that I LOVE that someone shared on Facebook about a guy who lived in LA and NYC and moved out to the West Texas desert to live a self-sufficient lifestyle. It's so inspiring to see people who live in the desert succeeding.

I'm so excited!!! We finished drying in the house this past weekend minus the front door and plastic covered windows. We'll start buying those in a couple of weeks. In the meantime, this weekend we bought some exterior insulation for the house that will eventually be covered by metal siding. We also got gable vents for the attic, a breaker box for the electrical, electrical sockets, and a chain saw so Tony can spend this coming weekend cutting down trees for the electric company so they can run their lines. In case of rain I wanted to make sure that we didn't lose any more time, so now we have interior projects we can fall back on with the interior electrical and plumbing equipment.

On Saturday, Bubba helped us finish the last couple of rows of insulated panels on the roof and put on a roof cap. Here's the roof cap and roof. Next step will be to get the green metal roof panels. Not sure how soon we'll do that.

Here are the other insulated panels we got for the walls. We decided not to go with the same panels we used on the roof because it takes so much time to put them up and they are fiberglass which is a pain to cut. We itched so badly the past couple of weeks from them. Cost wise they worked out about the same, they just don't have the same structural benefit the SIPs (structural insulated panels) as what we used on the roof. The house is structrually sound though so we figured we didn't really need the extra "stability".
A close up of the panel, it's just a thick foam with the company logo sheeting on one side and aluminum foil on the other. If you are doing a brick or stone exterior the foil side is placed facing out to reflect the heat that the brick and stone absorb. For other exteriors the foil is placed facing inward to reflect the heat or air conditioning back inside depending upon the time of year.
We also got the 2nd living room window put up. These windows make me happy. I'm estimating that just from the windows and sinks that Tony's mom and step-dad have given us that they salvaged from past home improvements and real estate remodels they've saved us at least $1k.
Gable vents installed on each side of the house and gables sealed off.

Putting up the exterior wall insulation. In the distance you can also see all the smoke from the grass fires that broke out all over Oklahoma between Friday and Sunday. This was on Sunday before it started raining that night.


Tuesday, March 15, 2011

Gardening

I'm dying to get my hands dirty and start gardening, but anything I plant here in Texas I won't be able to harvest before we move to Oklahoma and anything I plant in Oklahoma I'm not there to tend. I plan on starting cream peas (similar to black-eyed peas) and okra once we're in Oklahoma since they love the heat, and it occurred to me today to start a few herbs that I can easily take with me.

I know I've mentioned before that I am interested in square foot gardening and in Oklahoma it will be our only option since we'll be living on a mountain. I have a book I've been reading, but today I came across an article that broke the info I've been searching for down to the bare bones and it's so unbelievably easy it's mind blowing. http://www.naturalhomemagazine.com/natural-landscaping/square-foot-gardening.aspx

Basically I'm going to need a mixture of 1/3 peat moss, 1/3 vermiculite, and 1/3 blended compost. From there if plants say to thin to 12", 1 plant goes into a square. From there plants to be thinned to 6" get 4 per square, 4" gets 9 per square, and 3" get 16 per square.

Now I'm trying to decide if I want to do long rows or 6 to 8 - 4'x4' boxes... Decisions, decisions.

Thursday, March 10, 2011

The ugly panels are back!

So it's been a while since I made an update. There hasn't been anything dramatic to show over the past month, so I thought I'd wait until I had something significant to post. There was also all the cold weather in February that made it hard to get any work done but now that things are starting to warm up we're seeing progress.

Davis Buildings in Stigler finally had some insulated panels in stock that we've been waiting on so I picked them up Friday and we got most of the roof done last weekend. Quinton & Diane's son, Bubba (Quinton Jr.), was a tremendous help getting the panels laid. I'm extremely grateful for him. This coming weekend we'll finish the roof panels and get started with another type of insulated panel we're getting for the walls (Polyisocyanurate Insulated Sheathing).  
The weekend of February 26 & 27, Tony worked alone on the house and put plastic up over the windows like in the photo above and started on the plumbing and electrical inside. The way Tony is doing the plumbing is by installing pvc conduit pipe, which is also used for safely running electrical wires through a house, then he will then run PEX pipe (in the photos below, blue is for the cold water line and red for the hot water line) through the conduit so if there is ever a water line break we can just pull the bad line from a central location instead of having a water leak somewhere in the wall. The PEX is also more flexible and easier to run than copper pipes, is cheaper, and has been shown to be less susceptible to corrosion than copper so long as it's not exposed to sunlight which can quickly make the PEX brittle.
All the electrical he's done so far is putting electrical boxes in place. 
I wasn't feeling well this weekend between nerve pain and a horrible migraine so Tony was sweet and let me kind of do my own thing, and I worked on knitting some seed stitch cloths that I can clean with, which I actually used to do dishes and scrub down a porcelain bathroom sink Tony's mom gave us from a rent house she owns and recently did renovations on. The sink had some paint and rust on it, which the paint came right off, but I still need to do some work on the rust which thankfully isn't bad.
I also spread some grow anywhere grass seed around the pond, where we plan on planting some trees (like a redbud) later in the spring. 
This Friday we're going to pick up the insulated sheathing like I mentioned above and I'm also going to get my front door, I'm so excited!!! The door in the link is the wrong size but it's essentially what we're getting, one w/a window since that wall won't have a window and the window has the mini-blind built in so there is no cleaning involved. Yay!

Friday, February 4, 2011

Snow Ice Cream

The snow just isn't stopping here in North Texas. Where I happen to live we got over an inch of ice plus 5+ inches of snow on Tuesday. Today we've gotten another few inches. A dear friend sent me a photo of her 21 month old daughter eating some snow ice cream. Of course I had to know how she made it. It's simply snow, milk, sugar and vanilla, and it is so yummy! Growing up we didn't have any traditions like snow ice cream. I did often go out and find icicles and pretend I was eating carrots or make the occasional snow angel.


It's so simple to make. It's 1 part sugar, 2 parts milk, vanilla to taste (a teaspoon to a tablespoon), and snow. Mix the sugar, milk and vanilla to combine, then add to snow. Mix until it reaches a consistency you like.

For example, I used 1/2 c sugar, 1 cup milk, 1 Tbs vanilla and I'd venture to guess 5-6 cups of snow. Keep adding snow or the milk mixture until it reaches a consistency you like. I personally dumped the milk mixture into the snow and I was happy with it.

Thanks, Mendie!!!!

Thursday, February 3, 2011

We Have Walls!!!

Before I give an update on the walls, I want to take a moment to thank the Grahams for all they have done for us. It was Quinton who got Tony the new job and gave us the opportunity to finally build a house with our own hands. Quinton and his boys have helped us tremendously with building the house and lending us tools. Diane has been tirelessly taking care of Tony in addition to the rest of her family, doing his laundry, cooking for him, etc., and it is greatly appreciated. I can't thank them enough for all that they have done for us over the years. They have opened their home and their hearts to us, making great sacrifices to be our friends. They've never hesitated to help us even when it would have been easier or understandable not to. Our dreams are coming true because of them. I love them deeply for their selflessness and generous hearts.

While I was up on Friday running around getting our vehicles repaired, I drove past this house that used the same metal sheeting that Tony and I are intending on using. This is my inspiration, it's going to be so cute!


The place we have been buying the insulated panels at has been out of stock recently, so Tony and I decided to first put up OSB for the walls until the panels come in. For a few hundred dollars it'll add another layer of insulation and help protect against drafts that might slip through the insulated panels.

The first board is up!


The first wall! This is the north side wall for the bedroom and closet.


My utility room! I really want sky lights in our next house.

Tony framing in the bathroom window.

Exterior door and utility room. 

Kitchen wall. Right now the plan is to have the sink under the window with countertops and cabinets on the left and a freestanding stove and fridge on the right.

Front of the house that looks over the view to the southeast. The living room is on the left and the bedroom on the right.

My closet. I'm trying to keep things as neat and organized as possible to make the whole process smoother.

Our table!

Exterior wall that faces northwest that  is the bathroom, kitchen and utility room.

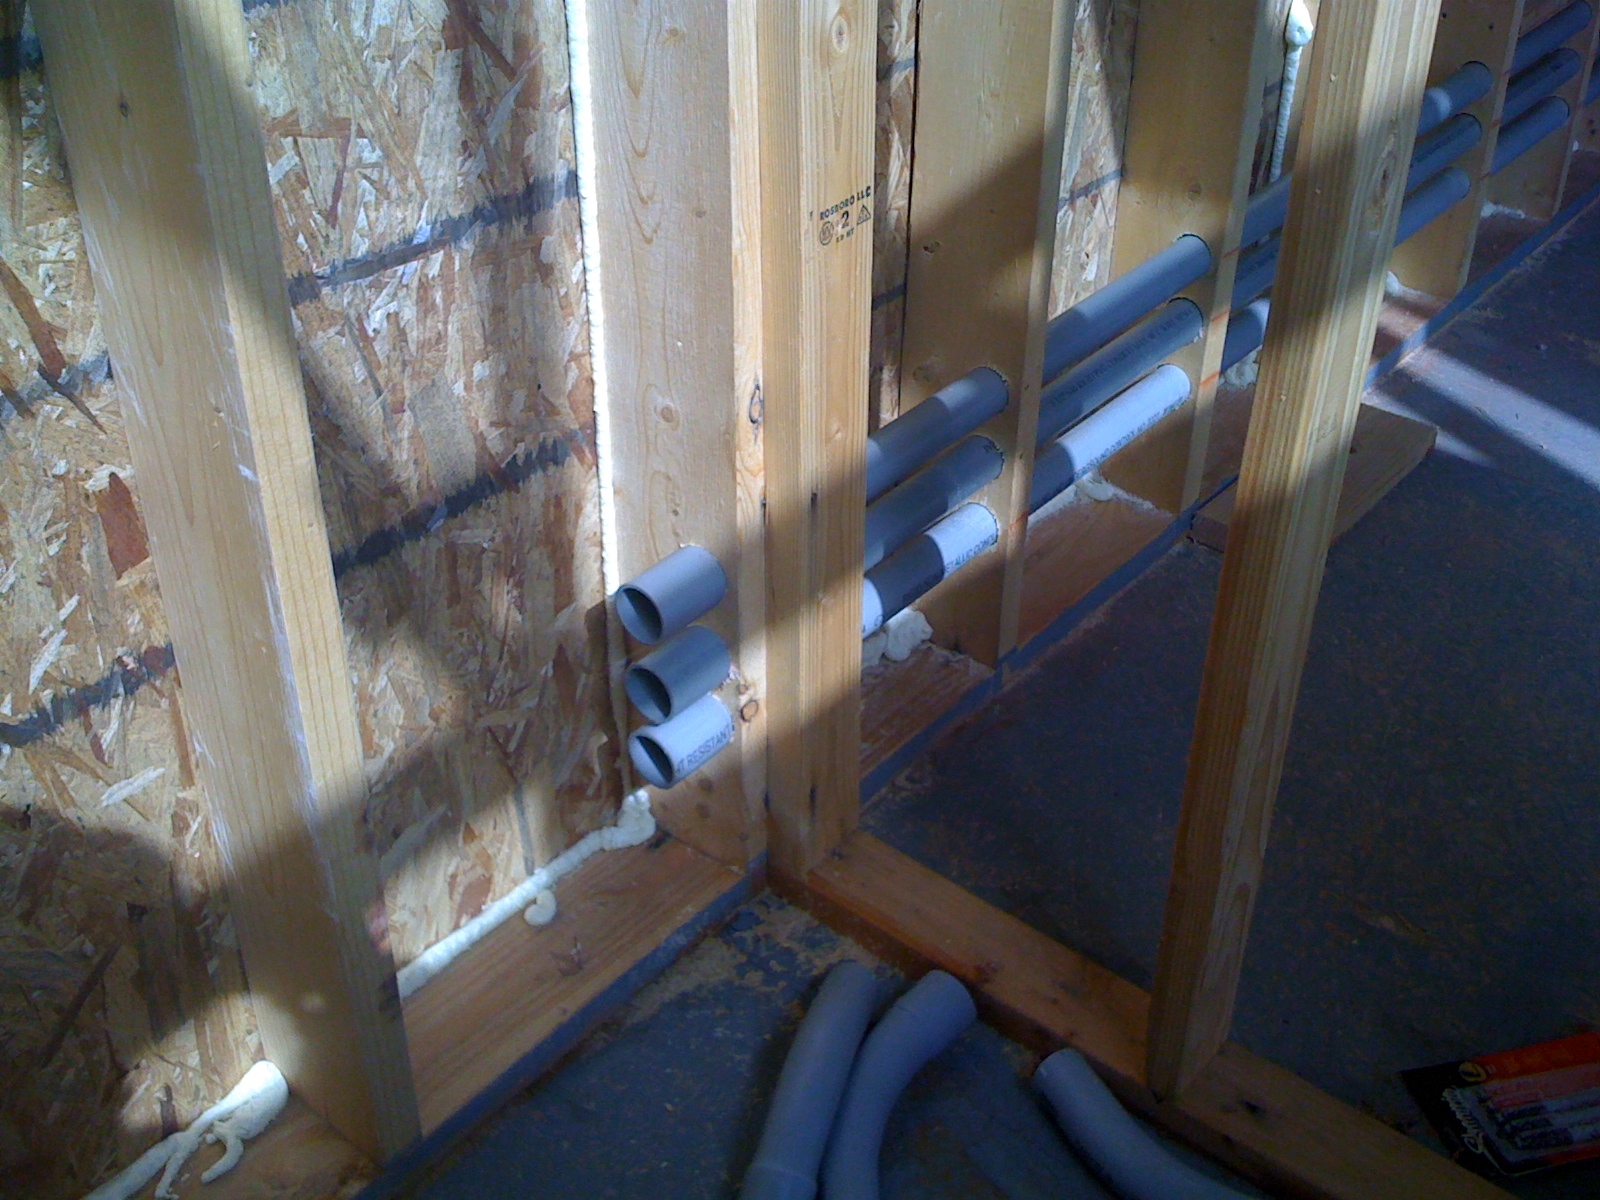
After getting the first board up, we realized how difficult it was to hit the studs without them being marked, so I marked them all, but Tony still missed from time to time, and eventually went around and filled every hole with Great Stuff. He also sealed in any gaps he found. This is one of the steps he's taking to this being Super House. If money were no object, he'd insulate the entire house in Great Stuff.

Tony in action with is favorite material.

Some cool stuff I saw while hiking around the property. Fungus and moss. I LOVE watching how nature changes with each season.

And finally, me!